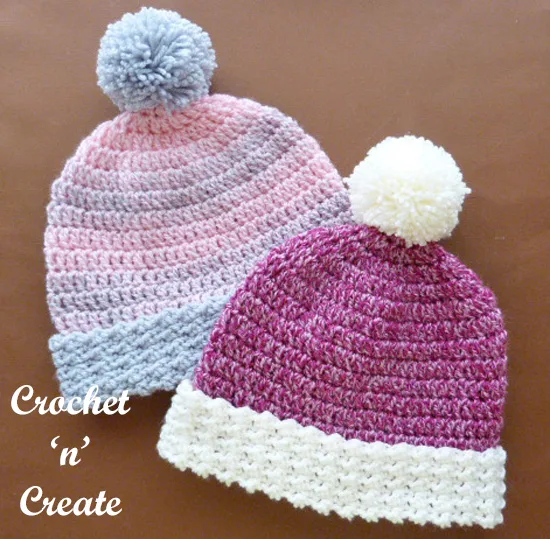
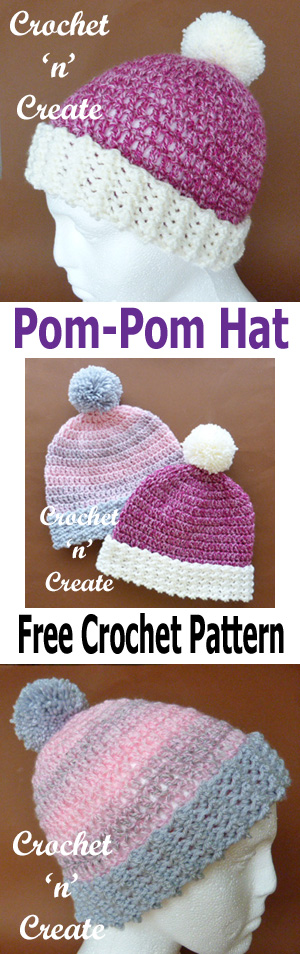
A fun to crochet pom-pom hat, made on a 6.00mm hook so it’s soft and warm to wear. It is a simple beanie that can be made to give to your family and friends as gifts or for yourself, made with a textured brim and finished off with a pom-pom topper!
See Collared Cowl to match.


Pom-Pom Hat CNC71
Scroll down the page for FREE pattern
Find all my FREE crochet patterns HERE
Abbreviations
RS. Right Side
ch. Chain
sc. Single Crochet
dc. Double Crochet
rpt. Repeat
sl st. Slip Stitch
Inc. Increase
Base of ch. Work in first stitch
ch3 counts as first dc
To fit size approx:- Adult Head
Materials
I have used:-
50 grams of Stylecraft Special DK in each of the colors 1 & 2
OR an equivalent yarn would be:-
1.75oz of Worsted Weight #3 in each of the colors 1 & 2
6.00mm crochet hook
GAUGE – 4dc & 2 rows measures approx 1 inch
Made in continuous rounds without turning until the 15th Row.
With color 1, ch4, sl st in 1st ch to form a ring, ch3, (RS) work 11dc in ring, sl st to top ch3 on beginning of row. (11dc + ch3)
2nd Row – (Inc Row) ch3, 1dc in base of ch3, 2dc in each dc to end, sl st to top of ch3 on beginning of row. (23dc + ch3)
3rd Row – ch3, 1dc in base of ch3, 1dc in next dc, * 2dc in next dc, 1dc in next dc, * rpt from * to * to end, sl st to the top of ch3 on the beginning of row. (35dc + ch3)
4th Row – (Inc Row) ch3, 1dc in base of ch3, 1dc in each of next 2dc, * 2dc in next dc, 1dc in each of next 2dc * rpt from * to * to end, sl st to top of ch3 on beginning of
row. (47dc + ch3)
5th Row – (Inc Row) ch3, 1dc in base of ch3, 1dc in each of next 3dc, * 2dc in next dc, 1dc in each of next 3dc, * rpt from * to * to end, sl st to top of ch3 on beginning of
row. (59dc + ch3)
6-15th Row – ch3, 1dc in each dc to end, sl st to top of ch3 on the beginning of row. Fasten off.
Turn at the end of the 15th row.

Join in color 2
Brim – Working in back loop of stitch only for this row ch1, 1sc in base of ch1, 1sc in each dc to end, sl st to first sc on beginning of row. Turn. (60sc)
Pattern Row 1 – ch1, sl st in base of ch1, * 1dc in next sc, sl st in next sc, * rpt from * to * to last sc, 1dc in last sc, sl st to sl st on the beginning of row. Turn.
Pattern Row 2 – ch1, 1sc in base of ch1, 1sc in each dc and sl st to end, sl st to first sc on beginning of row. Turn.
Rpt Pattern Rows 1 & 2 three more times.
Rpt Pattern Row 1 once. Fasten off.
Using color 2 make a large pom-pom, I used the Clover Pom-Pom maker 65.
Finishing – Weave in all loose ends of yarn and trim off, fold brim on to RS of hat, attach pom-pom to crown and secure.
* * * *
See more free crochet hat & headband patterns:-
Bumpy Ear Warmer – Ladies Headband – Warm Beanie
Square Hat – Valentine Headband – Sparkly Ridge Crochet Headband
hope you enjoy all the designs, happy crocheting!
* * * *
Hope you enjoy this free crochet pattern for a pom-pom hat, don’t forget to pin it!
 That’s all for now for folks, happy hooking until next time!


**************************************************************
All pattern sizing, yarn weights, gauges etc on this website are approx as everybody crochets differently. Every effort is made to ensure this pattern is correct, but I am only human so mistakes may be made, if you find one please let me know by e-mail on crochetncreate@btinternet.com
The written instructions and pictures for this pom-pom hat pattern are copyrighted to crochet ‘n’ create © 2017.
You are welcome to sell the finished products made from the free crochet pom-pom hat pattern, I just ask that you please use your own pictures and put a link back to crochet ‘n’ create.
If you wish to share this crochet pom-pom hat pattern on your social media or your blog please only use a direct link to the pattern page on crochet ‘n’ create.
* * * * * * * * * * * * * * * * * * * * * * * * * *